Associate App allows users to customize products before adding them to the cart. This guide outlines the process of implementing this functionality on our platform and covers handling product configurations. You can customize a product using add-ons or by extending the product attributes.
Add-ons are product extensions, such as embroidery (physically attached) or accessories like power adapters. A parent-child relationship exists between an add-on and the product it is attached to. For example, associates could add a laptop to a cart and customize it by selecting add-ons like extended warranties or additional storage.
After implementing this functionality, users will experience a flow like explained in the example below that will allow them to customize and add the product to cart:
Open the laptop product details page in the Associate App.
Tap the customization button.
View the webview displaying the UI you provided for product customization.
In the UI, add the warranty to the laptop.
Add the laptop with the warranty to the cart, automatically returning to the Associate App and showing the changed cart.
.png?sv=2026-02-06&spr=https&st=2026-07-21T12%3A08%3A52Z&se=2026-07-21T12%3A21%3A52Z&sr=c&sp=r&sig=nnlogOlBOiu294AGv97w4AuhUgNw26pMXc%2FCQX%2FBsOo%3D)
Product detail page with custom button “Product configurator”.
To create this flow, you need to:
Set up a custom button: Add call to action button in the
Product DetailsscreenBuild and publish a web app: Build and publish a webview to allow users to customize products (which will be rendered in a webview within the Associate App)
Setting up a custom button
To add a custom "Call to Action" button on the Product Details screen you must create a custom button:
In Omnichannel Manager, go to
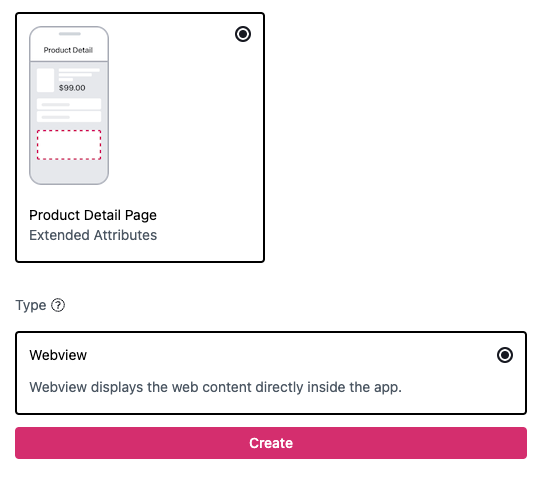
Settings>Associate App>Customizationsand clickAdd.Enter a name for the customization. For example, Custom product configurator.
Select
Product Detailsas theLocation.Choose
Webviewas theType.Click
Createto proceed.Creating the button will take you to the custom product configurator screen. Enter the button
TitleandCaption. Leave all other fields empty, and save the changes. You can set the URL after publishing the app, and remember to enable the customization after that.
Setting up a new web app
After adding the button to the Product Details, you must build and publish a web application that allows users to customize products. This application will be displayed within the Associate App through a webview.
When your application is rendered from the
Product Details, it receives cart, store, associate identifiers, and the product data from the webview through thewindow.NEWSTOREobject.
const { cartId, storeId, associateId, ...product } = window.NEWSTORE.contextProps.formDataNavigating to the application does not change the cart by default. You need to add the product to the cart using the Cart API, which allows you to include any extended attributes or custom price books.
const parentProductResponse = await fetch(`${baseUrl}/checkout/carts/${cartId}/items`, {
    headers: {
       authorization: Bearer ${auth.accessToken},
       "content-type": "application/json",
   },
   body: JSON.stringify({
      product_id: product.id,
      fulfillment: "IN_STORE_HANDOVER",
      price: { source: "INTERNAL", source_id: "default" }
   }),
   method: "POST",
   mode: "cors",
})
After adding the product, use Cart API to customize it with one or more add-ons. There are no restrictions on the product identifiers that you can attach as an add-on. It is up to the application to decide which ones are valid: it can be a hard-coded list, obtained an integration, or passed from the Associate App through the extended attributes of the parent product.
const parentLocation = parentProductResponse.headers.get('Location')
await fetch(`${parentLocation}/add-ons`, {
   headers: {
      authorization: `Bearer ${auth.accessToken}`,
      "content-type": "application/json",
   },
   body: JSON.stringify({
      product_id: addon.id,
      fulfillment: "IN_STORE_HANDOVER",
      price: { source: "INTERNAL", source_id: pricebook },
   }),
   method: "POST",
   mode: "cors",
})
Reload the cart from within your application using a deeplink:
window.open(`com.newstore.associate-one://cart/load?cartId=${cartId}`)After the cart is refreshed, close the webview and return to the Associate App.
window.ReactNativeWebView.postMessage(JSON.stringify({ type: 'close' }))After publishing the app, return to your custom product configurator settings in Omnichannel Manager and set the URL. This will ensure that the custom button correctly redirects users to your custom app.
Adjusting sales receipt template
To adjust the sales receipt template to display add-ons, update the template configuration to nest add-ons under their respective parent products. In the template, ensure that add-ons are visually linked to their parent product by using indentation or grouping. This adjustment helps maintain clarity for both customers and sales associates by clearly distinguishing primary products from their associated extensions.
{% for addon in item.addons %}
  <tr>
    <td class="desc" style="padding-left:2rem">
      <strong>{{ addon.product_name }}</strong>
    </td>
    <td class="amount">
      <span>{{ currency_code }} {{ format_currency(addon.price_net) }}</span>
    </td>
  </tr>
{% endfor %}